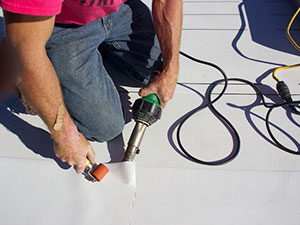
So…. you want to learn How to Patch a TPO Roof huh? Leaky roofs are a nightmare for any business owner. But with a little know-how and the right tools, you can tackle TPO roof anomaly yourself and save on costly professional services. This guide will walk you through the step-by-step process, ensuring a watertight seal and a longer lifespan for your roof.
Why TPO Roofs Need Patching
TPO (Thermoplastic Polyolefin) is a popular roofing material known for its durability and energy efficiency. However, punctures, tears, or seam failures can occur due to weather, debris, or installation issues. These leaks can lead to water damage, mold growth, and structural problems if left unchecked.

Tools and Materials You’ll Need
Before you begin, gather the following supplies:
- TPO Patch: Make sure it’s the right size and thickness for your roof.
- Cleaner: A specialized TPO cleaner is recommended for optimal adhesion.
- Rags: Use clean, lint-free rags for drying and cleaning.
- Heat Gun or Welding Tool: This is essential for activating the adhesive on the patch.
- Probe: This tool helps ensure a proper seal around the patch edges.
- Bleed Block (Optional): Provides extra protection against leaks.
Step-by-Step How to Patch a TPO Roof Instructions
- Prepare the Area: Thoroughly dry the area around the leak using rags. Remove any debris or dirt that could interfere with the patch.
- Clean the Surface: Apply TPO cleaner to the damaged area and wipe it clean. Allow it to dry completely.
- Cut and Position the Patch: Cut a TPO patch slightly larger than the hole, ensuring it covers the entire damaged area. Round the corners for a better seal.
- Heat and Apply: Use a heat gun or welding tool to heat the patch and the surrounding roof area. Carefully position the patch over the hole and press it firmly into place.
- Seal the Edges: Use the heat gun to seal the edges of the patch, working your way around the perimeter. Ensure a complete seal to prevent water infiltration.
- Check for Cold Welds: Use a probe to gently press down on the patch, checking for air bubbles or gaps. Apply additional heat if needed to ensure a smooth, even surface.
- Final Touches: Clean up any excess adhesive or debris. Apply bleed block around the edges for added protection (optional).
- Document the Repair: Mark the patch with the date and a brief description of the repair for future reference.
When to Call a Professional
While minor TPO roof repairs can be a DIY project, larger or complex issues may require professional expertise. If you’re unsure about the extent of the damage or lack the necessary tools and experience, it’s best to contact a reputable roofing contractor.
Need Expert Help? Call Commercial Roof Repair Solutions!
If you’re in the Houston area and need professional roof leak repair services, contact Commercial Roof Repair Solutions at 281-928-4428. Our experienced team can handle any roof repair or replacement project, ensuring your commercial property stays protected from the elements.
Don’t let a leaky roof damage your business. Take action today and keep your roof in top shape!
